Saturday, December 22, 2012

Moldy Salami

So the other day I found a little mold on my salami.  At first I was excited because the mold was white and white is good when it's on your salami.


As you can see not much for concern, just a little around the tip on the second one.  So I let it go hoping for the best.  The next morning I looked into my sausage chamber to find this.


Clearly, this is no good.  So I e-mailed a recent acquaintance of mine Joe Cicala, executive chef and salumiere at the excellent restaurant in South Philly Le VirtĂș.  By the way if you are ever in Philly I highly recommend the restaurant, amazing Italian cuisine, great atmosphere and service not to mention Joe and his crew make all their pasta, sausage and salumi from scratch.  Joe advised me to spray the moldy salami with red wine, I didn't have any on hand but I did have red wine vinegar so I sprayed and rubbed the salami down.  It took about two days but on the second day my salami was back in working order.

Another thing Joe told told me was to lower the temp and humidity.  My humidity was about 70% and the temp was around 55 degrees Fahrenheit.  Joe told me to lower it to 50 degrees and 60% humidity.  I noticed that all my salami stiffened up and and began to become tighter in its casing.  All in all, they were results that anyone would be happy to find with their salami.  So if you ever find yourself with a moldy salami just rub it down with some red wine vinegar and it will be back in business in no time!


Tuesday, December 18, 2012

Coppa update

Well the Coppa from the butchery post came out of the cure today weighing almost exactly 10% less than it did when it was completely fresh. Make sure to rinse it before you weigh it, the amount of salt and moisture will mess up the weight.

I rinsed and rubbed it with white wine, it's a cheap chardonnay.

For my spice i chose Fennel and Black Pepper.  I didn't measure out the amounts for the spices, just made sure to get nice coverage.

Finally I used the remainder of my beef bung to encase it and again I used the continuous tie method.  Here it is hanging with the rest of my salumi so far.  It's starting to get kind of crowded in the chamber, can't wait till that cacciatorini is done, I'll be sure to make a "tasting" post.


Monday, December 17, 2012

Fresh Italian Sausage


Ok so on this post I wanted to do a fresh sausage recipe, I have made this once before but I didn't keep record of the percentages of everything for the recipe.  This time i did.  If you plan on making something more than once it's a good idea to know exactly what you did the first time that way you can make corrections

Step 1: Weigh and then rough cube your cut of meat.  For me I used 4 and 1/2 pounds of pork shoulder.  A lot of pork sausages recipes will tell you to use a lean meat and a portion of fat back or pork belly.  I didn't have fat back or pork belly so i just used the shoulder, there is a good fat to meat ratio on a pork shoulder anyway usually 70% meat 30% fat.

Step 2: Put meat in the freezer and get your spices together.

This is what i used.

4.5lbs (2016g) pork shoulder 100%
30g kosher salt 1.5%
20g sugar 1%
14g fennel .7%
10g paprika .5%
8g red pepper flake .4%
8g black pepper .4%
9g (two cloves) crused garlic .45% (roughly)
1 cup white wine

Step 3: Mix dry ingredients into cubed pork and put back in freezer for at least 15 minutes. Keeping the meat cold ensures that the fat doesn't smear into the meat.

Step 4: Grind meat.  I use the meat grinder attachment for the Kitchen Aid Stand Mixer but you can use whatever grinder you prefer.  The grinder plate is the larger one of the two.

Step 5:  After the meat is ground you can mix the wine in.  I use my hands to mix.

You'll notice that the bowl is in a larger bowl that is filled with ice water.  This is another technique to keep the meat constantly cold.  After the wine is incorporated put it back in the freezer for another 15mins.

Step 6: Stuff.  I'm using hog casings here.  You can link the sausages as you go as I'm doing here by twisting or you can use twine.

And the final product.

To cook, I pan fry on low heat so that the casings don't burst but you can experiment with numerous cooking techniques.  Lastly and most important, enjoy!


Bresaola


This is a type of salumi that originated in northern Italy and has Austrian influences.  It's made with beef eye round which makes it distinct from the typical pork salumi that is most common all over Italy.  This is what it looks like untrimmed from the store

The first thing i did after taking it out of the package was rinse it then start trimming off all the silver skin and a decent portion of fat.  Out of the package it weighed 5.37lbs.

And after I trimmed it it came out to 5lb 13 oz.  Kinda gross but here is the amount of silver skin and fat that came off.

It's important to re-weigh the meat again after trimming as this will be the weight you will be basing your lost weight percentage from.


 I converted the pound weight to grams in order to make the loss weight more accurate to calculate as well as getting the spices, and salt percentages to fit.  The weight in grams was 2636.5 g.  For the cure i used 132g kosher salt and 6.5g cure#2.

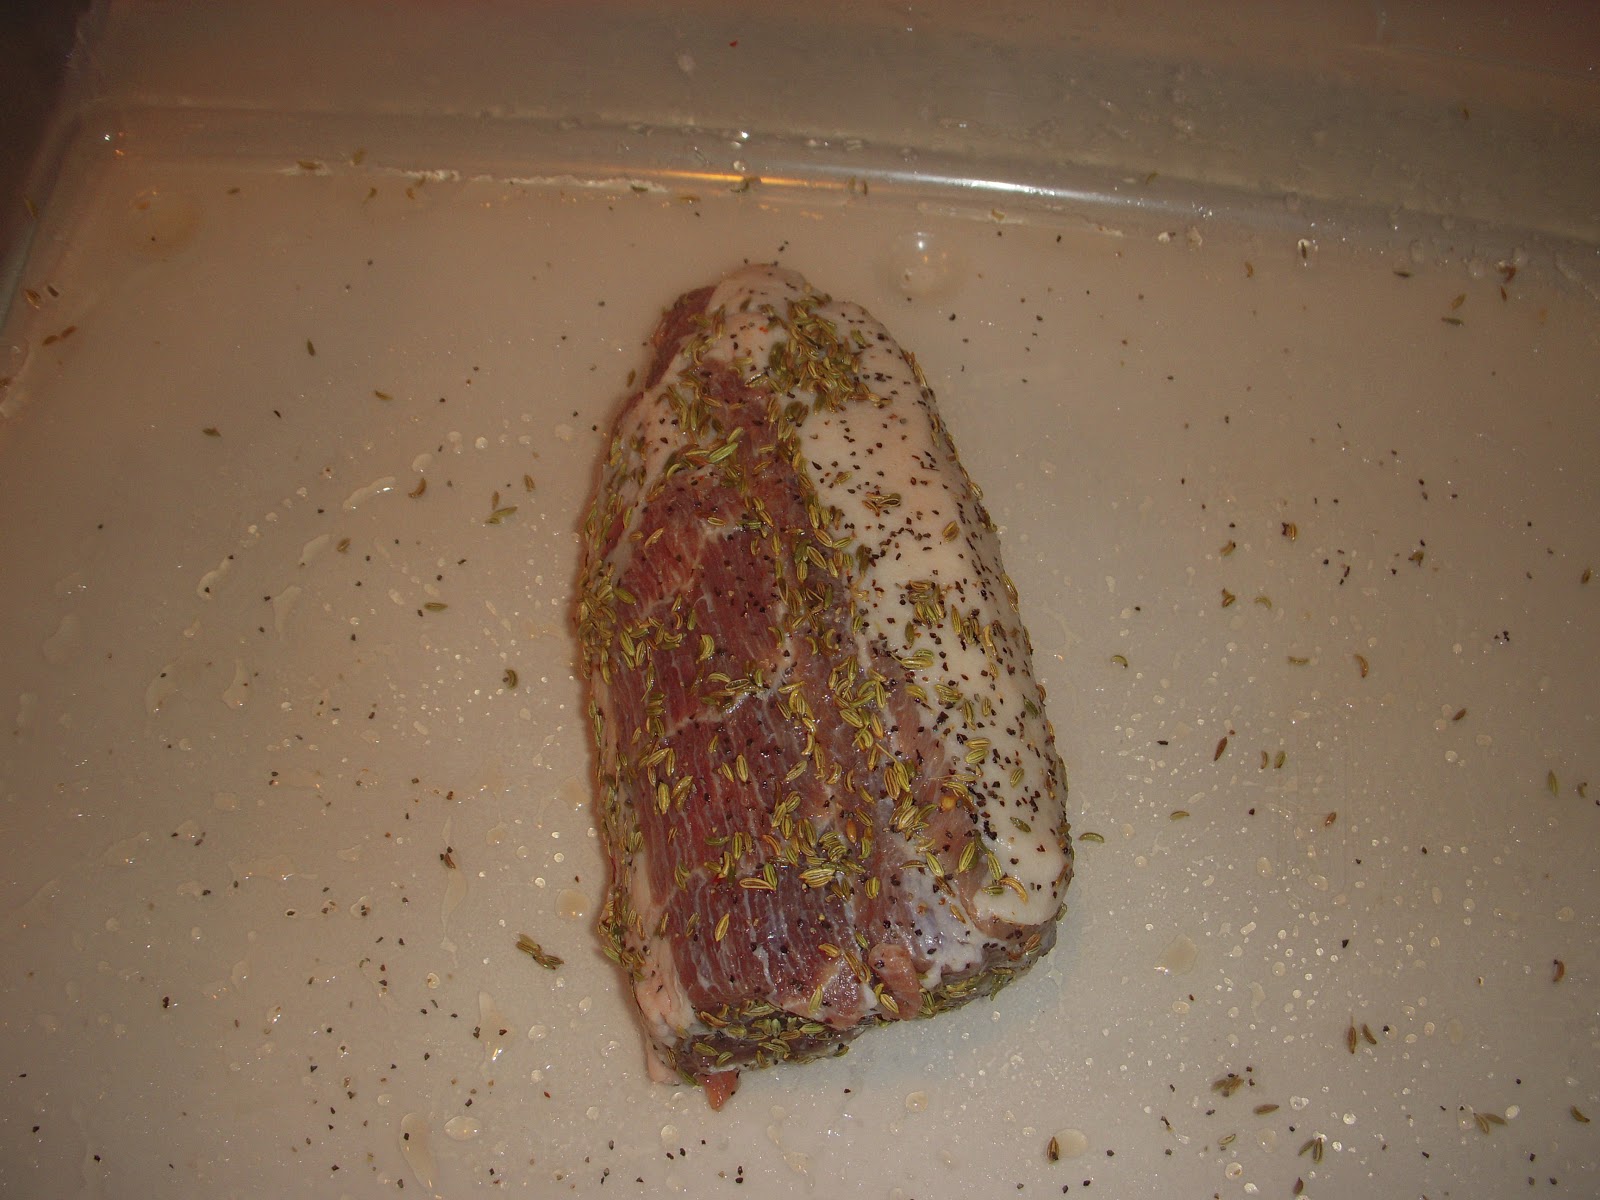
There was also an unmeasured amount of black peppercorn and red pepper flakes in the cure.  I left the beef in the cure, in the fridge for three days.  I only really wanted to lose about 10% of its weight in the cure but because i was busy over the weekend it stayed in longer and lost about 22%, (589.5g).  I don't think this is really that big of a deal I've read other blogs that leave their meat to cure for up to 15 days so i guess there is more than one way to do this.  So after three days this is what i looked like.

The next step is to rinse it.  I rinsed it under the faucet with cold water then rubbed a red wine into it.  This is also the step where you would rub it with all your aromatics (spices).  After that is done it is time to stuff it in a casing.  I used a natural beef bung that I ordered online.  I soaked the bung in half water and white vinegar for 24hrs before rinsing it again, cutting it to length and stuffing the beef into it.


Once the meat is fully encased i spent a little time working the water out from between the meat and the casing.  This made the casing cling tighter to the meat.  Next is the tying process.  I used the "continuous tie" method that i picked up from the book "Salumi" by Michael Rhulman and Brian Polcyn.  This is a great book to read by the way, if you're interested in making salumi.

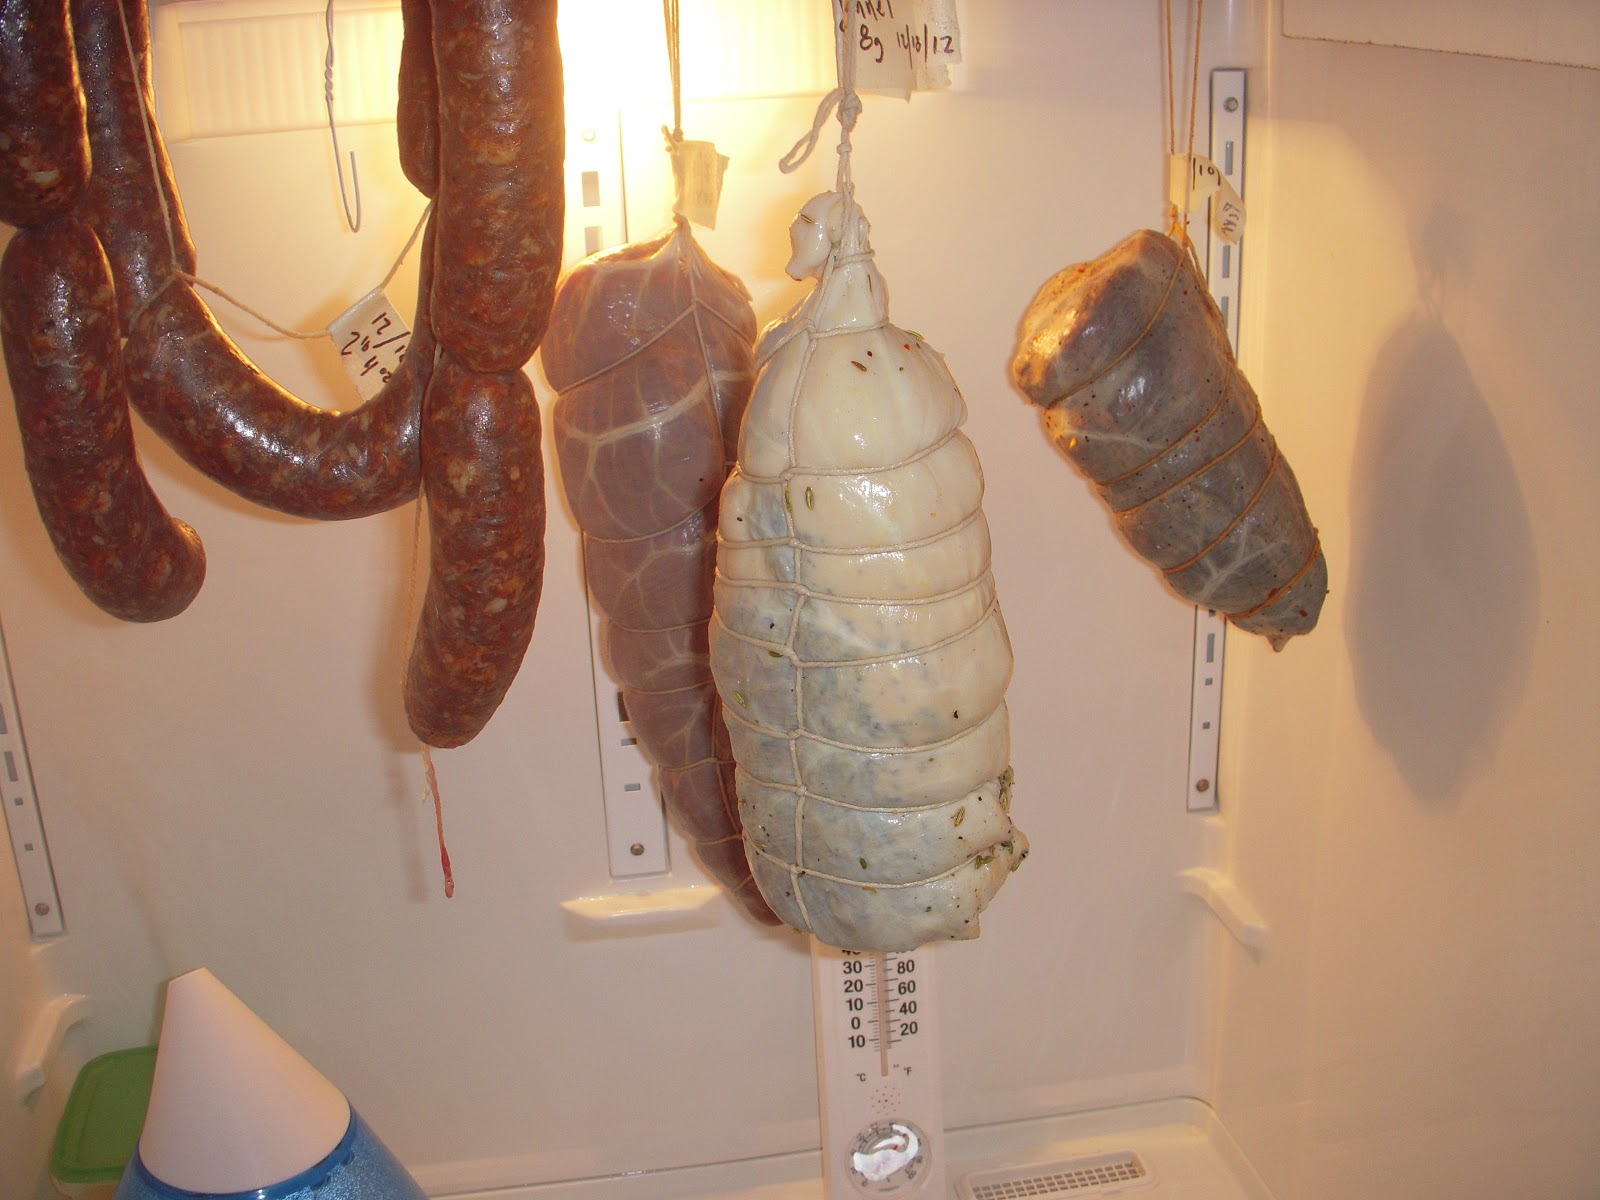
Finally it is ready for the curing chamber.

That's the Bresaola to the right.  In the foreground is a cacciatorini sausage and the one in the middle is a black pepper cured Coppa.


Friday, December 14, 2012

Coppa: Removing the shoulder blade and separating the coppa from the rest of the shoulder

The Coppa, or Capocollo, known by most italian americans colloquially –as well as Tony Soprano– as Gabbagool, is the muscle above the shoulder that runs from the back of the head and makes up the first part of the back of the neck.  This is how the shoulder comes if you purchase it at BJ'S and most likely any other local wholesale store.

I buy the shoulder or "Boston Butt" with the shoulder blade still attached.  I like to remove the bone myself being careful not to cut into the Coppa.  If you can locate the shoulder blade, the Coppa is the striated muscle on the opposite side of the Butt.

And this is me removing the blade from the opposite side.


Once the bone is out, make sure you check the remaining meat for any small bone shards you may have accidentally trimmed from the bone.  The next step is removing the coopa from the rest of the shoulder.  Try to find a logical place to separate the shoulder into two pieces. There should be a seam in the muscle, you want the Coppa to look somewhat cylindrical in the end.  This is what i came out with.

You can see the great fat marbling that makes this cut so perfect for salumi.  I trimmed it up just a bit before i put it in the cure.  Hope this helps with anyone considering butchering the shoulder themselves, trust me its pretty straight forward.  More on the curing process next time.


Wednesday, December 12, 2012

Welcome Omnivores!

I'm creating this blog because I love food.  All food, and hopefully so do you.  I've got a little over 26 years of eating above my belt –pun intended– and most recently I've been trying my hand in the kitchen.  One of the things I would like to convey in this blog is my desire to use fresh ingredients, and to make as many food items at home from scratch.  It became evident to me, after my interest in food went beyond digestion, that many of the food items we use to "cook" can be made at home from scratch.  Items like Mayonnaise, ketchup, BBQ sauce, salad dressing and various other condiments are made from basic ingredients in a basic formula.  If you've ever looked below the nutritional facts on a food label and actually scanned the Ingredients –and I'm sure you have– you were most likely confronted by a litany of words that sounded more appropriate for cleaning supplies than food.  Most of these things are preservatives.  The good thing about preservatives is that they allow food to last longer, on the shelf as well as in your fridge.  But if you're anything like me, part of you has always felt uneasy about ingesting all these chemicals.  Maybe you have gone down the organic road, this is great.  I myself prefer organic, my only issue with organic foods is their price tag.  It can be expensive to always shop for 100% organic products.  In making these basic household ingredients yourself you can save money and enjoy the rewarding feeling of becoming a little more self sufficient.  The cool thing about making your own condiments and sauces is that when you cook with your own ingredients, your getting a lot closer to the truth when you say you've made a "homemade" meal.  In my opinion if your using condiments and sauces that came from the store, your food is not entirely homemade.  Another benefit of this mindset is that your food comes out tasting more unique, with more subtlety and reflection of your individual taste as an eater.

This is not a blog on how to cook, believe me I am nowhere close to being qualified to teach the culinary arts.  I have no formal training other than home study of cookbooks, TV shows, trial and error and trusting in my palate.  This blog is just a way to document and share my fun and experiences in the kitchen.  Most likely i will be sharing recipes and formulas in photo and written form.  I hope to create and share food fundamentals, like condiments and sauces as well as whole dishes.  Recently I've been bitten by the fatty bug that goes by the names of "Charcuterie" and "Salumi" that's right, naturally preserved and salted cured meats.  These products are found in the dishes of almost every culture and region and it doesn't get much more homemade than making your own sausage, duck confit or salami.  Hopefully you're just as curious about making food from scratch as I am and we can share our success's as well as our failures –in hopes to not repeat them– and in turn become more knowledgeable and self sufficient eaters.  Until the next post, hopefully there will be fewer words and more pictures.