Saturday, March 2, 2013
Another Great Video
Friday, February 15, 2013
Salame Di Cinghiale
I've been wanting to try using some wild game in a salame recipe for a while now. The other weekend I went to a Italian specialty store about a half hour from my house and while I was browsing the meat section I saw this beauty.

Finding this kind of clinched my decision for trying my hand at some wild boar salame or, salame di cinghiale as it is called in Italy where wild boar is not an uncommon ingredient, (especially in the central regions of Italy).
One of the things I came across while referring to various recipes was that you could freeze the boar for up to three days to ward off Trichinosis. Trichinosis is a parasite that you can get by eating undercooked or raw pork (usually home reared, and fed raw meat) and wild game. I won't get into the specifics of this factoid, partly because I'm not qualified and mostly because it detracts from the point of this blog, but if you are curious, the internet is an amazing thing with some amazing and graphic pictures. Anyway, I'll start talking about the process of making Cinghiale di Salame now...
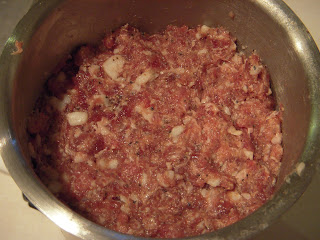
The first thing I noticed that made this wild game stand out apart from its domestic counterpart was the amount of silverskin or fascia that covered basically the entire shoulder. Fascia is a connective membrane like tissue that covers muscles, humans have it too. Obviously a wild boar is going to be more active than a hog that has been bred not to be able to trot a hundred yards without keeling over. That being said, the is more muscular and leaner which means more fascia. It took a good amount of time to trim most of the fascia, and admittedly, I didn't get it all. Even though I took my time, trying to trim away just the skin and not the muscle, when it was all said and done the shoulder no longer weighed 3.01lbs like it says on the package. The boar came out to around 2.5lbs. Most of the recipe's I saw combined regular pork shoulder and fat back with the boar. I used the percentages of meat that Rhulman uses 3 lbs boar, 1 lb pork, 1 lb fatback. Like I said the boar weighed a little less than three pounds so i reduced the rest of the meat and fat accordingly. Here's what the boar looked like once it was cubed.
 You'll notice the color is much more red than regular pork shoulder. Here it is again with the pork and fatback.
 The rest of the steps are basically identical to making any salame or fresh sausage except for the addition of cure#2 in salame and the specific spices you want to use. Here is my spice mixture. I kept this one very simple in order to showcase the flavor of the boar, just salt, cure, black pepper and garlic.

Rub your spices and salt into the pork before it is ground and the put it in the freezer for at least a half hour.

I only ground this once this time, with the large die for the Kitchenaid grinder attachment. I wanted a lumpier, more rustic mouth feel with larger bits of fat.

Next is to incorporate some kind of wine. I've been tasting different Italian wines lately, mostly ones made with grapes indigenous to southern Italy. This grape, Aglianico, comes from the region of Campania, home to Naples and the Amalfi coast. It is a very popular grape in Campania though, not as popular here in the states at least not in PA wine and spirits stores where the majority of red wine found in the Italian section are various Chianti. I had to go to a wine and spirits positioned in one of the wealthier towns near me to find a wine with this grape and they only had one producer. This one has a DOC or Denominazione di Origine Controllata, designation which translates into "controlled place of named origin. DOCG, DOC, IGT, and Vino da Tavola, are all wine classifications that wines and vineyards can get in Italy that regulate and specify the type of grape used, the region, the age and other factors to ensure a quality authentic product. I won't get into wine too much as I don't know enough about it yet but there are plenty of sources to acquire knowledge from on the subject if you are interested.

Luckily I enjoyed the flavor very much, very dry with a little kick, almost like the homemade wine I have tried but without the usual grape juice or dirty taste that usually accompanies homemade wine. I guess basically it was that almost harsh after taste that it had that made me think of the homemade stuff. But all in all I liked it and thought it would make a good pairing with the boar. Anyway, I poured a little more than half a cup of this wine into the meat mixture, then mixed with my hands till it was fully incorporated into the meat.
The rest of this process I have shown a couple times now but I'll give you a brief pictorial of the process. The casings are synthetic again (a lot less prep work). Here's the meat in the stuffing canister.
And the stuffing.


That about sums it up. Keep checking back for more posts and I'd be happy to answer any questions I can so don't be afraid to leave a comment or two. Thanks again!

Finding this kind of clinched my decision for trying my hand at some wild boar salame or, salame di cinghiale as it is called in Italy where wild boar is not an uncommon ingredient, (especially in the central regions of Italy).
One of the things I came across while referring to various recipes was that you could freeze the boar for up to three days to ward off Trichinosis. Trichinosis is a parasite that you can get by eating undercooked or raw pork (usually home reared, and fed raw meat) and wild game. I won't get into the specifics of this factoid, partly because I'm not qualified and mostly because it detracts from the point of this blog, but if you are curious, the internet is an amazing thing with some amazing and graphic pictures. Anyway, I'll start talking about the process of making Cinghiale di Salame now...


Rub your spices and salt into the pork before it is ground and the put it in the freezer for at least a half hour.

I only ground this once this time, with the large die for the Kitchenaid grinder attachment. I wanted a lumpier, more rustic mouth feel with larger bits of fat.

Next is to incorporate some kind of wine. I've been tasting different Italian wines lately, mostly ones made with grapes indigenous to southern Italy. This grape, Aglianico, comes from the region of Campania, home to Naples and the Amalfi coast. It is a very popular grape in Campania though, not as popular here in the states at least not in PA wine and spirits stores where the majority of red wine found in the Italian section are various Chianti. I had to go to a wine and spirits positioned in one of the wealthier towns near me to find a wine with this grape and they only had one producer. This one has a DOC or Denominazione di Origine Controllata, designation which translates into "controlled place of named origin. DOCG, DOC, IGT, and Vino da Tavola, are all wine classifications that wines and vineyards can get in Italy that regulate and specify the type of grape used, the region, the age and other factors to ensure a quality authentic product. I won't get into wine too much as I don't know enough about it yet but there are plenty of sources to acquire knowledge from on the subject if you are interested.

Luckily I enjoyed the flavor very much, very dry with a little kick, almost like the homemade wine I have tried but without the usual grape juice or dirty taste that usually accompanies homemade wine. I guess basically it was that almost harsh after taste that it had that made me think of the homemade stuff. But all in all I liked it and thought it would make a good pairing with the boar. Anyway, I poured a little more than half a cup of this wine into the meat mixture, then mixed with my hands till it was fully incorporated into the meat.
The rest of this process I have shown a couple times now but I'll give you a brief pictorial of the process. The casings are synthetic again (a lot less prep work). Here's the meat in the stuffing canister.

And the stuffing.


That about sums it up. Keep checking back for more posts and I'd be happy to answer any questions I can so don't be afraid to leave a comment or two. Thanks again!
Monday, February 11, 2013
Mortadella
First off I need to say that this recipe came from Marc Vetri's book Rustic Italian Food, a great book for anyone interested in cooking classic Italian dishes. Mark, and his co-owner and exec chef Brad Spence at the Philadelphia restaurant, Amis are doing some really impressive things in the realm of Salumi. This is a recipe for Lamb Mortadella but I replaced the Lamb with all pork butt. Also I didn't use any cure #1 (only because I didn't have any at the time and got impatient) which is recommended for all slow cooked Salumi. I asked Chef Spence, via twitter if it was okay to eat the Mortadella without the cure and he said yeah, the only effect would be the color and the fact that it wouldn't keep as long.
Here's the cubed fatback, the slightly pink fat is actually fresh fat that I sliced off and froze from another especially fatty pork butt.
 8 ounces of this stays whole and gets blanched for 30 seconds then chilled. It goes into the Mortadella whole to give it that traditional appearance in the end result.
Here it is after the first grin, no other ingredients are added yet except for pork and fat.

And again after another 4 passes through the food grinder.
 You can tell how much smoother and light pink the texture is. At this point you add in your spice as well as the dehydrated milk, sugar, unflavored gelatin, pistachios, ice water, salt, wine and other ingredients and mix to further emulsify.
 And mix.


Stuff mix into meat stuffer and begin to stuff. This is a 5lb hand crank stuffer from LEM, a much better tool than the 12 dollar sausage stuffer attachment from Kitchenaid.


 After it is stuffed (here in a 100mm sythetic casing) it's poached at a low temp of 160-170 for 2-3 hrs and until it maintains an internal temp of 150. Sorry it was pretty late by the time I got around to poaching it that night and I forgot to take any pics of that process but there's really nothing to it, pretty boring actually, just find a roasting pan big enough for your Mortadella and keep an eye on the temp with a submersion thermometer. Also make sure it fully cools before slicing into it as it will firm up as it cools. Since I didn't use any cure#1 the color came out like a giant Bratwurst. the flavor is great I'm just a little unhappy with the overall texture, it's too crumbly almost like meatloaf. I think this may be because it didn't emulsify enough. Next time I'm going to use a food processor and see if I can get a tighter mix.

 Definitely pick up the book Rustic Italian Food by Marc Vetri if you want a more in detail explanation and recipe. Thanks again and keep checking back for more posts!
Here's the cubed fatback, the slightly pink fat is actually fresh fat that I sliced off and froze from another especially fatty pork butt.

Here it is after the first grin, no other ingredients are added yet except for pork and fat.

And again after another 4 passes through the food grinder.


Stuff mix into meat stuffer and begin to stuff. This is a 5lb hand crank stuffer from LEM, a much better tool than the 12 dollar sausage stuffer attachment from Kitchenaid.


Grand Salami
This is the biggest cured meat I have produced so far. This is just a basic Salame recipe the quantities and percentages of each ingredient were decided upon by myself and reflect a culmination of numerous recipe's I have read and my own experimentation thus far. This beast weighs in at about 7 1/2 pounds, the recipe is as follows.

 Sorry for the lack of pictures during the process but the only difference between this one and the fresh sausage is the cure #2 and the fact that on this guy I used a 100mm synthetic casing and extra fat, (fatback).
Recipe:
Pork Butt: 6lbs (2724g)
Fatback: 1.5 lbs (681g)
Sea Salt: 94 g (2.75% of total weight of meat and fat)
Cure #2: 8.5g (.25% of total weight of meat and fat)
Superfine sugar: 15g
Fennel: 7g
Garlic: 3 cloves, (ground with mix
Red wine (Montepulciano D'Abruzzo)
Black Pepper: 2.5g
Paprika: 2.5g
The amount of spices is pretty toned down from my fresh sausage so we'll see how it turns out.
Coppa Finished
So here are the pictures of the finished two coppe from my chamber. First I'll talk about the Fennel and black pepper Coppa.

 I took this out of the chamber 2/3/13. After about three weeks of this coppa being in the chamber I started checking it's weight loss weekly. What I discovered was that it was losing anywhere from 20-30g a week, around 2% of it's weight. It's weight on Sunday 1/27/13 was 832g, I checked again the following Sunday and the weight had remained exactly the same. I figured this was a pretty good indication that it had lost all it was going to lose, about 24% total. Also I checked with my contact and expert in all things salumi, Chef Joe Cicala at Le Virtú in south Philly and he confirmed my assessment. So I cut into it and the results are the pictures above.
Taste wise, it was still very salty but had a really good nutty, woody porkness to it kind of a prosciutto taste but less intense. I've learned that the saltiness in a cured meat should lessen the longer it hangs so I wrapped the exposed, cut area with cheesecloth and put it back in my cure chamber. I'm going to keep tasting for saltiness once about every two weeks but overall I'm very happy with the results.
Next is the black and red pepper Coppa.

 This was the first Coppa I ever did and I had a few issues with it. First of all I cut it from the pork butt before I had a casing for it and wrapped it in cheesecloth instead. Once I got the casing, about a week later, I transferred it to the beef bung. I think this had a reaction with the outer meat and fat of the Coppa because it looked smelled and felt a lot different than the fennel one as it aged. First of all it felt like I had some minor case hardening (check out Rhulman's book for more information on case hardening) and the smell was slightly acidic and sour, almost cheese like. This one went in a week before the fennel. Also I must have thrown away my notes with the original weight so judging accurately it's loss was impossible. Long story short I felt I had ruined this one so I decided to just cut into it anyway the same day as the fennel. The meat was much more moist in the center, depite having aged longer and the flavor was much less salty the texture was closer to rare roast beef than ham. Actually I thought this tasted awesome and I've been eating it along with the fennel, so far. no botulism or any other health issues.
All around I feel like both of these were successful and I can't wait to do another one and try another recipe.


Taste wise, it was still very salty but had a really good nutty, woody porkness to it kind of a prosciutto taste but less intense. I've learned that the saltiness in a cured meat should lessen the longer it hangs so I wrapped the exposed, cut area with cheesecloth and put it back in my cure chamber. I'm going to keep tasting for saltiness once about every two weeks but overall I'm very happy with the results.
Next is the black and red pepper Coppa.


All around I feel like both of these were successful and I can't wait to do another one and try another recipe.
Wednesday, January 23, 2013
Videos
Here are a couple great videos I came across on youtube today. I've watched a bunch and these ones are really good!
Thursday, January 17, 2013
Tartine Starter
So I've been baking bread for a few months now and have used various sites and books for assistance. A couple good books are The Bread Bakers Apprentice by Peter Reinhart, and Rustic Italian Food by Marc Vetri. Both books are great but Rheinhart's is completely focused on bread. Recently I picked up another book called Tartine Bread. This book is by Chad Robertson who is the owner and baker of Tartine Bakery in San Francisco CA. There are also some great videos on youtube of Chad and his renowned bread. Anyway the book is great and has step by step instructions on how to come close to making the kind of bread that Chad does at Tartine. The first step, and the one I'm documenting with this post is the wild yeast starter.
A bread starter is like a little dough that you make the night before (usually) and let ferment until you add it in when making your bread dough the next day. The idea is that it adds flavor, and because it is already pre-fermented it gives the dough a boost when it comes to the rising process. Most standard starters like poolish, biga, pate fermentee use yeast water and flour to get the starter well, started. A wild yeast starter is only water and flour, about equal parts, mixed together and left to sit and ferment. The idea is that the wild yeasts that are in the air at all times come together in the flour/water paste and naturally ferment. This is how sourdough is made. I'm no expert at this so this is just the process to my understanding if there is anyone who wants to correct me feel free to leave a comment.
Robertson recommends half all purpose flour and half whole wheat mixed together in a small container, covered and left in a shady place for two to three days until you can see bubble forming and a dark crust has formed on the top of the mixture. A clear container works best, as you can see if the bubbles are forming or not. I used a small wonton soup container from take-out Chinese. Here's what the starter looked like after three days.
 The smell is strong like stinky cheese. Pull back the crust and discard, then discard more leaving about 20% of the starter.
 At this point mix in equal parts flour (half whole wheat half AP) and water and mix. I used 2/3 cup for each. This is what is referred to as "feeding" your starter. One the starter is mixed to a smooth paste again, cover and let sit for another day till it is time to feed again.
 For more information about wild yeasts and fermentation check out Sandor Katz's book Wild Fermentation, there's a ton of information on the subject and not just for bread. Thanks, and check back for more posts on the progress of this starter!
A bread starter is like a little dough that you make the night before (usually) and let ferment until you add it in when making your bread dough the next day. The idea is that it adds flavor, and because it is already pre-fermented it gives the dough a boost when it comes to the rising process. Most standard starters like poolish, biga, pate fermentee use yeast water and flour to get the starter well, started. A wild yeast starter is only water and flour, about equal parts, mixed together and left to sit and ferment. The idea is that the wild yeasts that are in the air at all times come together in the flour/water paste and naturally ferment. This is how sourdough is made. I'm no expert at this so this is just the process to my understanding if there is anyone who wants to correct me feel free to leave a comment.
Robertson recommends half all purpose flour and half whole wheat mixed together in a small container, covered and left in a shady place for two to three days until you can see bubble forming and a dark crust has formed on the top of the mixture. A clear container works best, as you can see if the bubbles are forming or not. I used a small wonton soup container from take-out Chinese. Here's what the starter looked like after three days.


Saturday, January 12, 2013
Bresaola Done
I took the bresaola out and cut into it 1/5/13, it hung for 20 days. When I weighed it on the fifth it was 1710 grams, an additional loss of 337g. Total loss was 926.5 grams. For most cured meats the desired loss is around 30%, for this bresaola 30% loss would have been a loss of 791g. As you can see it lost a good amount more of water weight.


Here's what the bresaola looked like once it was cut into to.


Thursday, January 3, 2013
Lamb Ragu with Gnocchi from scatch
Well I've been wanting to try a rich ragu for a while now and what better time than during the cold months of winter. A ragu is basically a rich meat sauce made for pasta. The meat is cooked in liquid for several hours until it is fork tender and has married into the sauce. Some people make this in a roasting pan and put it in the oven. For this recipe I used a stock pot and cooked it on the stove top.
I bought a boneless leg of lamb and cut away three pounds.


Next step add in the wine which acts like a braising liquid. I used 2.5 cups red table wine and reduced that by half before adding the tomato's. The tomato's are Contadina San Marzano whole canned tomato's. To me (as well as many other people) San Marzano give a great rich and sweet taste. I removed these from their cans, squeezed the whole tomato's in my hand, leaving the most of the juice in the can and measured out about 40 ounces. Add these to the pot and let all ingredients simmer for several hours. Basically what you're doing is letting all the water in your ingredients to escape via vapor (steam), what happens is that you are left with more solids in all your ingredients and more concentrated flavor as well as a thicker sauce. Here is what the pot looked like after the first hour


I served this over a bowl of gnocchi that I made from scratch. Here is a picture of the end result. More on how to make the gnocchi in the next post, until then!

Subscribe to:
Posts (Atom)